Tuesday, December 12, 2006

The ROA Companion . . .


Hi Pards,


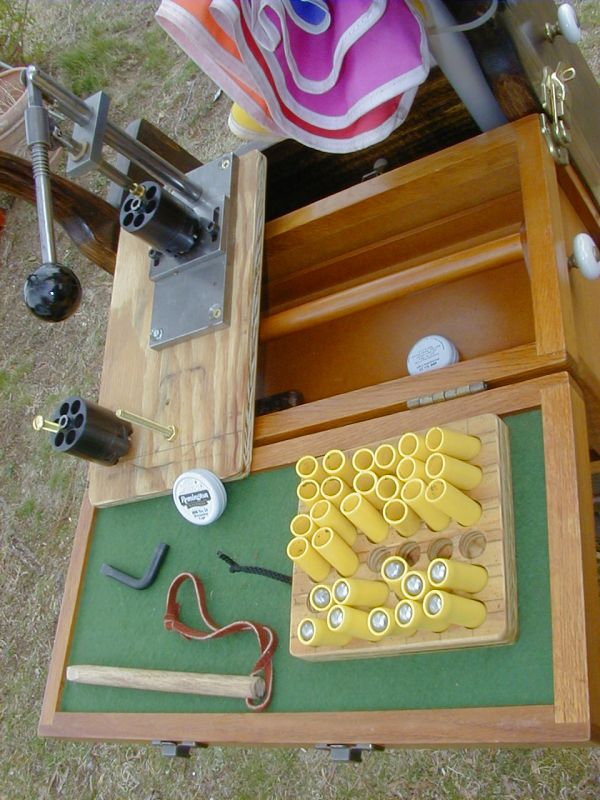
Got a picture to show the Taylor's .45 Conversion cylinder and bullets. The ball is the usual .457 diameter for the ROA. The conical bullet is the new EEP-UG 45-150 big lube bullet. It's rebated base allows it to be loaded in the ROA cap and ball cylinder just like the ball. However, the EPP-UG carries it's own lube. No grease cookies or lube over the ball needed. I'm using the new Cowboy 45 Special brass that is near identical to the .45 ACP in length and takes similar smokeless loads. The brass shown in the picture is .45 Colt.


I used 1 CC of LIDU in the ROA cap and ball cylinder under both the ball and the EPP-UG bullets and the load worked great. For the Cowboy 45 Special, I used the same 1 + CC of LIDU; however, added a bit more to get 2MM compression under the EPP-UG bullet.


For smokeless in the conversion cylinder using the Cowboy 45 Special brass, I used 2.6 - .7 of Clays and filled the case to the bell with Wally World grits. Seated a 160 LRNFP smokeless bullet with a Redding profile crimp die.


I'm still looking for vials to hold 5 lubed EPP-UG 45-150 bullets. Can't cap the yellow tubes with a lubed bullet. So, I use some PRS 45-250 as plugs for the yellow tubes and continue to use premeasured 2Fg LIDU.


Works for me . . . Thanks fer looking.

Tuesday, May 16, 2006

Securing the guncart to the Neuton wagon


Hi Cowboys,

The picture shows the axle passing through the Neuton hauler box just in front of the rear wheel. The key keeps the axle locked in place. An identical arrangement is on the opposite side. The axle passes through the gun cart base. A second axle with like arrangement passes through the front of the tub and again through the gun cart. This secures the gun cart so it cannot move unless the axles are removed. The rear axle of this arrangement will be used with the rear hauler wheels if the Neuton fails. Gotta have some way to keep going under any circumstance.

Saturday, May 13, 2006

Neuton guncart hauler continued . . .

Hi Cowboys,

Don't know fer sure if this gun cart hauler will work out, but I've made some modifications to stabilize the unit. The add on wheels float about 1/2 inch above the turf on the level so the swivel wheel can help steer while under power. The add on wheels will help stabilize the umbrella in the wind and stabilize the cart when using the C & B loading tool. Still haven't worked out how to hold the cart on the hauler. The intent is to allow the cart to return to the original manual layout in case the motorized unit fails. The rear wheels will fit right back on the original cart. Most likely I'll lower the work box on the back about a foot as the hauler makes it too high for convenient use.

In this view, the wheels are set back about 8 inches from the swivel steering wheel. The set back is what gives the hauler it's stability. The set back bracket is tack welded for now. Notice also that I've removed the upper part of the tub. I intend to make a shroud and anchor it to the tub to give the plastic some rigidity. The bungie tie down doesn't do the job that's needed. But, the components must disassemble to reduce the lift weight to haul the thing in my truck.

I'll set a second battery on the plastic above the rear wheels. Need to check the electronics for the charging system so I'll know if I can just couple the charger to the add on battery. Removing the battery from underneath the cart is much too difficult to replace a drained battery.

Spare tires might also be a problem, but . . .

The cart is rated for 200 pounds, so it won't hold my weight. Added a 3 legged stool to the cart for the purpose.

Sure doesn't look very cowboy in this configuration. :(

More later . . .

Tuesday, May 09, 2006

My syringe for Buller Lube and a gun cart hauler

Hi Cowboys,

Things are kind of out of order per usual. So, here's he umbrella deployed on the cart. Too dark, but flash work is hard in bright sun light.


The picture of the Newton Hauler is a work up to a real cart using the drive assembly. For now, I've removed the wheels and set the old cart inside the wheel barrow. The run time is advertised as 5 hours, but that's for intermittant use. The real continuous run time for a fully charged battery is 90 minutes. I'll add a second battery to have as back up. The cart will handle 200 pounds.

The old fashioned syringe with the cannula tip squared off is great for running a bead of lube around the perimeter of the ball in the C&B chamber. Used Pearl Lube softened with lots of olive oil. While wads can work well below the ball, I like the economy of using the syringe.

Thursday, March 02, 2006

Electric Wheel Chair to be used as a gun cart hauler

Here it is, a prototype powered wheel chair to be used to haul my gun cart. Possibly a more powerful model at a later date will serve to carry my aging frame. This model is so old that maintenance and or manuals are no longer available, but . . .

The small Invacare wheel chair can pull considerable weight on more or less level terrain. The front foot rests are removed. My intent is to remove the seat and use the control for remote steering from the rear of along side the drive assembly. The gun cart may be towed from front or back as yet to be determined. Decoration is still in the planning process. Suggestions are certainly welcome.

Gun Cart Cap and Ball Revolver Loading

The far right image of the gun cart with umbrella shows the over all design. The addition of the guns in the rack immediately in front of the tool box and the weight of ammo and accessories in the lower box provide balance and stability for the cart.

The tool box is easily removed by opening the snaps on each side.


This is the loading cart open and ready to load cap and ball. The off gun loading tool presses the 147 grain pure lead balls into the cylinder chambers. The cylinder with the brass indicator marks the chamber that will not be loaded. The nipple of this chamber is painted orange. The brass pin on the board keeps the cylinder secure.

The yellow plastic ampules are for premeasured black powder and the .457 pure lead ball seals the ampule until needed.

The white tin holds #10 Remington caps.

The black "L" is the Ruger nipple wrench.

The stick with the leather thong is to push the caps home after setting on the nipples with a nipple holder.


This shows the cart accessory chest
open and the C &B loading tool hinged out of the way. The hinge has a removable pin so the tool can be removed when not needed.

Without accessories on board, the pins at the bottom of the board hold the cylinders for powder charging.


This image shows the tool board in it's raised position for access to the accessory box.

Hope the images help with your gun cart layout for loading C&B at the gun cart. For situation where the loading must be done at the unload table, simply roll the cart next to the table.

Whoops, don't know how to delete the duplicate image.